DIY burlap bed skirt

Hey there! Long time no write! So, I’ve come to realize that I do not have enough time to blog all of my awesome crafts around the house :/ Especially now that I’m preggers and all the “free time” I do have, I’m sleeping. Sooo, I re-decorated our master room about, eh, 5ish months ago. I ended up making some burlap curtains, I turned an old $5 mirror from Salvation Army into a vintage-y looking one with burlap all around it and lace, AND I made this burlap bed skirt!

IMG_9158

It was EASY!!! NO LIE! I figured I’d share the few steps it took to get this thing completed…

Supplies needed:

  • Burlap material (I used natural, and bought an entire roll from Hobby Lobby for $17 after the 40% discount..score!)
  • Scissors
  • Sewing pins

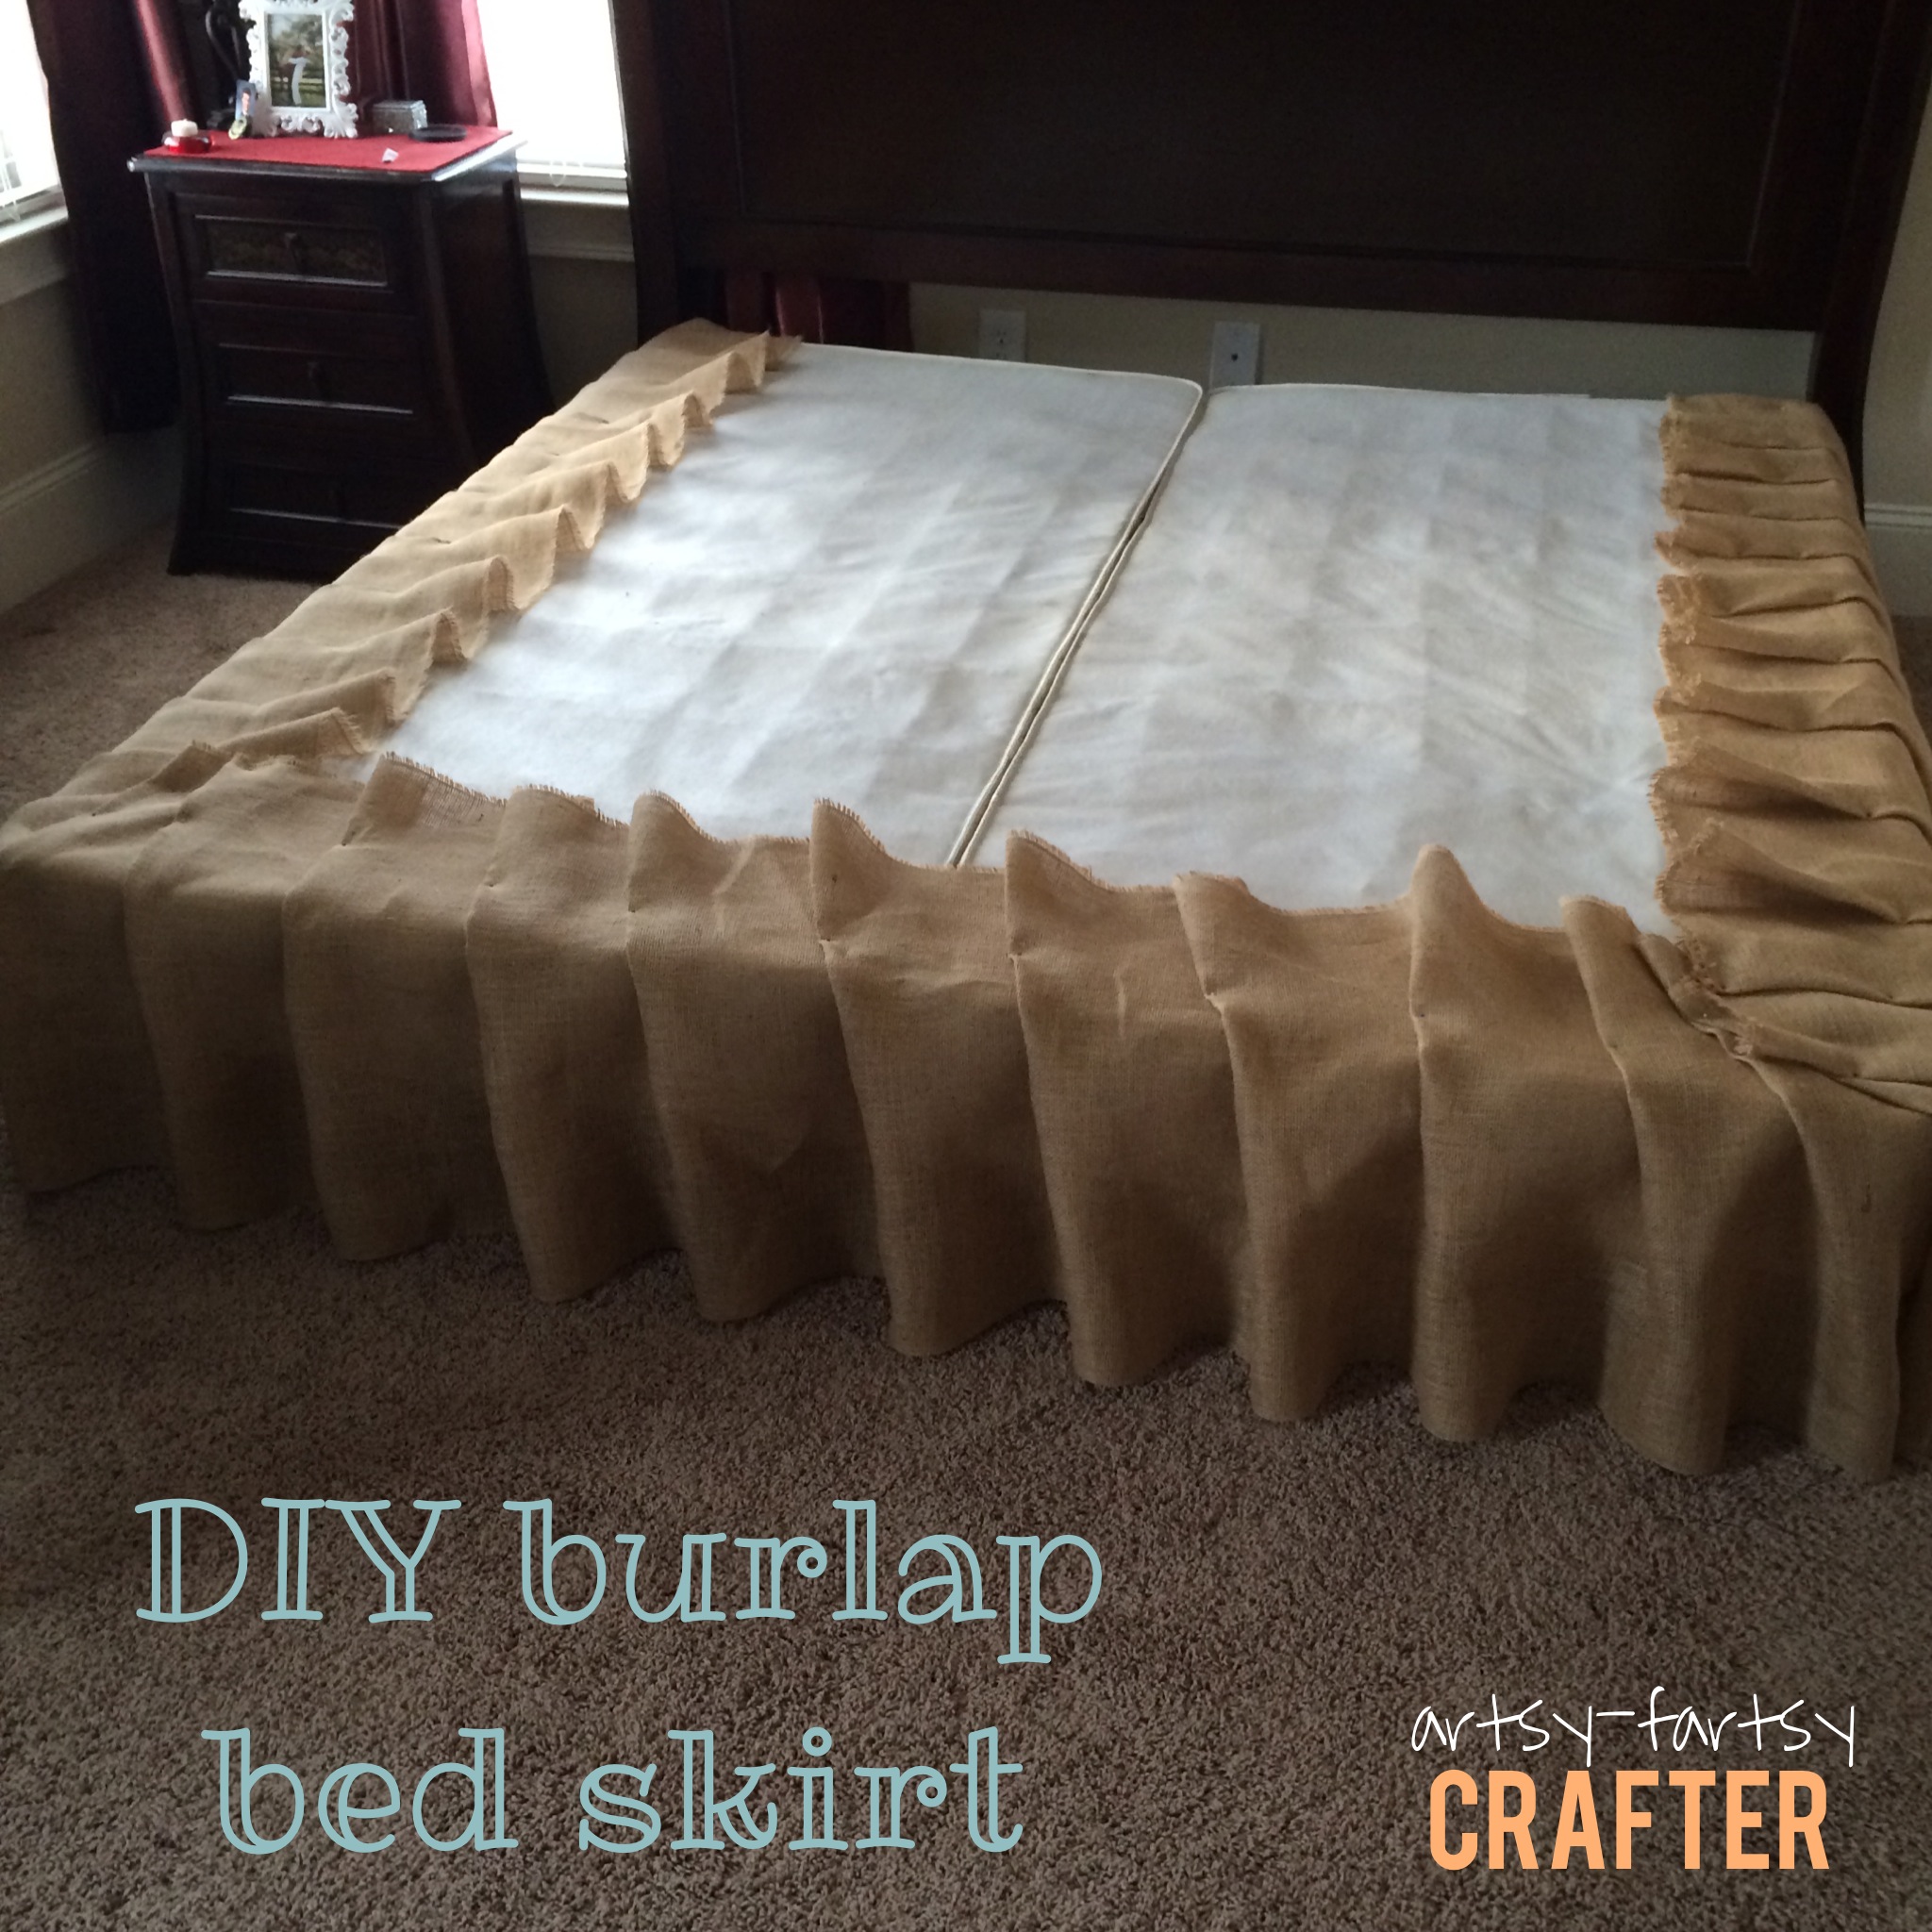
First things first [I’m the realest] – Cut your fabric in half like so…

         1                       2

I think my bed took about 8 yards, or was it 10? I can’t remember it’s been so long. But I have a king size bed and I just cut 7 yards off the entire roll and added some towards the end…it also depends on how much scrunch you want in the burlap.

Hang the fabric off the side of the box spring until it barely touches the floor (or however long you’d prefer it to be) Place a pin at the corner, bunch up a little fabric to make a scrunch and place another pin…and so on until your entire box spring is covered!

                          5          4                                                        3

I didn’t measure how far in between the creases were, I just placed the pin where ever I thought looked best…the corners were way easier than you’d think. just fold the material over, place a few pins and then keep working.

                     6                                   7

before you know it (or about an hour later, with breaks) you’re getting close to being done!

                8                           9

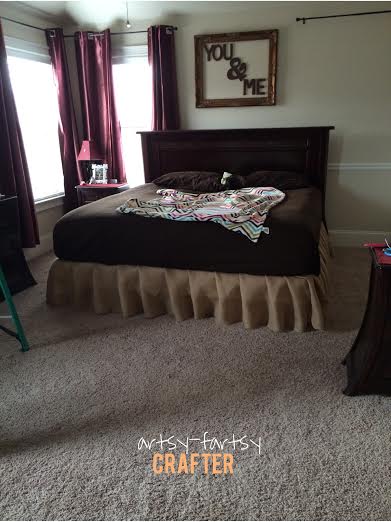
Don’t mind the mess…I was re-arranging my entire room. And the final product::

                                                                                IMG_9159

THAT’S IT! Very simple! Be sure to send pics/tag my blog if you give it a try! 🙂

-ashleigh.

DIY canvas look-a-likes

HOW- TO:
unnamed

Hello again! Interested in making some SUPER CHEAP canvas look-a-likes?! I’m a huge canvas lover, but personally would never spend $300 on one this size! I wouldn’t even want to spend $50 on a small one. Mostly because I’m cheap, but also because there are SO many different ways to create canvas look-a-likes for little to no money!

This DIY canvas look-a-like literally took me about 40 minutes to do and $20!! And I absolutely LOVE them!! If you’re a crafter you most likely have most of these supplies already at your house, like I did. Here’s what you need to make these for yourself:

Supplies:
• Foam board (from Home Depot or Lowe’s) cut out to the size canvas you would like
• 4 engineer prints. Mine were 2×3 in size (staples will do these for about $4 a piece… NOTE this is only for black and white pictures. I wanted color, but if you want color the price jumps up significantly! To like $80 for one! You can order them offline from any other store you’d like as well) Also, Make sure you order something larger than your foam board so the picture can be wrapped around it.
• Spray adhesive (make sure it works on FOAM! Or else it will eat it away and you’ll be left with tiny holes all over)
• Double sided tape (I picked up some Scotch that worked best for walls without removing the paint with it when you take it down)

Steps:

1) I took my flash drive to staples and had them print out my 4 pictures. I chose 2×3 but you can go bigger or smaller based off of your foam board size. And if you want more of a close up picture then go bigger and just cut the extras off 🙂

2) My foam boards were already the perfect size, so I just laid the pictures down on the foam and adjusted it to where I’d like to glue it. (MAKE SURE YOU MEASURE THESE BEFORE YOU BUY THE PICTURES SO YOU KNOW YOUR PICTURE WILL FIT. Also you need to make sure your picture is big enough to wrap around the sides of the foam and a little on the back.)

DSC01096

DSC01102

3) I then sprayed the adhesive on half of the board, meanwhile holding my picture up…I laid the picture back down and smoothed it out nicely and adjusted the picture to the perfect spot. Then I did the other half of the picture. Once the entire front was done I let it dry by putting it to the side and working on my other 3 pictures.

DSC01100

DSC01103

4) Once all 4 of my pictures were glued down in the front I started back at the first picture to glue down the sides. I did this part just like wrapping a present. VERY tight on the corners so you could barely tell that there was a little fold there…this picture kind of shows it.

DSC01111

5) After all 4 canvas look-a-likes were done I let them sit for another 10-15 mins just to make sure the back was completely dried before I hung them up on my wall.

6)Lastly, I applied some Scotch tape to the back and stuck them to the wall. 🙂

DSC01109

DSC01110

DSC01107

I hope y’all enjoyed this one as much as I did!! Let me know what cha think!

-ashleigh.

It’s been awhile…

Hello readers! Happy Friday!

It’s been WAY too long, obviously. Honestly, I got a job. And it’s been keeping me busy 🙂 I haven’t been doing as many projects, but don’t get me wrong I’ve done a few over the past few months. Like this DIY fish tank thingy majiggy:

Before:                                                                                                   After:

IMG_5766                 unnamed (1)

Picked this beauty up from a thrift store for $20! I think it’s supposed to be a microwave stand or some come-bob-err? But I decided to spray paint it, throw some stained wood on the top (because I was afraid the tank would be too heavy for the thin piece of wood that was currently on there), and I got some awesome vintage door knobs from Hobby Lobby as well. Whatcha think?! I think my fishies like it 🙂

I also made this fun colorful collage for the hallway:

unnamed (2)

I painted the submarine and printed out the sayings (I just threw something together in Photoshop for that). This anchor was my first string art project, I took a couple of pictures of this super easy (but time consuming) project. I’ll post that next week for you!

And maybe a few other little things around the house when I had time. A couple of Pinterest fails as well…like these mason jar soap dispensers that we still use everyday (sorry a bit blurry for some reason)…

unnamed

I wouldn’t say it’s a huge fail, just should have put some more time into spray painting the top so it didn’t chip off every time I press down on it. Bla. But you can find a great (MUCH BETTER than I could make) tutorial here for these!

Besides that, the hubster and I watched a little LOT of Breaking Bad…like all 5 seasons. And I’m pretty much in love with Walter White and Jesse Pinkman<3 Buuuut now I’m in a “no show can ever be better than Breaking Bad” phase. I started Scandal from the beginning, which is good (but no BB!)

Anywho!! Just did this beauty last week, took me about 40 minutes and less than $20!

unnamed

Stay tuned for a little blog explaining how to do this yourself!! 🙂 [[don’t worry, I’m actually starting to write this one up as we speak you read. So it should be up by the beginning of next week, and not four months from now.]]

OH AND A HUGE PS. —–> thank you SO much to all the ladies and gents out there re-pinning my Pinterest posts!!! I’ve gotten like 200+ re-pins on just this one alone! I feel so loved ☺ and honored that people are creating some of these DIY projects themselves. :))

unnamed (3)

Until next time,

-ashleigh.

~be our guest~

ch-ch-checkkk out this awesome DIY chalkboard sign I made for our guest room!
{new layout, still working with it…you may need to click on pictures to make them bigger}

image (3)

 image (5)

image (6)

Note: This is a Pinterest inspired sign, unfortunately the only ones I could find on there do not have a link connected to them. Therefore,  I cannot link this to the original creator -__- but if she/he sees this let me know and I’ll add your link in here —->

Okie dokie, let’s get started!

What you need:

– MDF board cut down to any size you’d like
(mine was something random like 43″x10″)
-Sander
– Primer
-Chalkboard paint
-Chalk
-Some sort of picture hanging tools & nails

These are the steps I took in completing this totally rad new sign for our guest room (remember you can change up any and all to make this one your own) ::

  1. Cut down MDF to your preferred size. Or just get Home Depot to do it for you like I didimage (8)
    image (7)
  2. Sand it down as best as you can
  3. I decided to attach the picture hanging thingys before I painted, because if I didn’t I just knew I would have put an hour into chalk lettering and then mess it up by laying it down on the front side…image (2)
  4. Prime it (I used a few small coats)image (1)
  5. Put your chalkboard paint on, small coats a few minutes apart (note: this is my very first time using this chalkboard spray paint and I didn’t have any problems, but I hear from other DIYers that using actual paint and rolling it on is WAY better than this spray paint stuff. Just an FYI) I was too excited and forgot to take a picture of this step.
  6. Wait 24 hours… and the bottle says to “prepare surface for use by rubbing the side of chalk over the entire surface. Erase and chalkboard is ready.”image
  7. Go crazy with whatever design you’d like. There are a ton of links up on Pinterest for “chalkboard lettering”
  8. I hung this one up by using the toothpaste method and it worked wonderful! I love this sign! I love this headboard! I love this chandelier! I just love this entire room! Now all I have to do is get some lamps, and sand down/prime/stain the night stands – stay tuned!

I hope ya’ll enjoyed this one! Let me know what you think 🙂

image (11)

image (5)

image (3)

image (9)

-ashleigh.

headboard love <3

Image

I AM IN LOVE ❤

Ideally, I would have loved to make this out of pallets but my first/second/third attempt at dismantling a pallet was a complete disaster. SO I just made a trip to Home Depot and bought some brand new wood for this project. Check it out!!

Supplies I used:

  • 3 – 1x6x10 wooden boards (had them cut in half right there at Home Depot to make them all 5′ long)
  • Wood Stain (I used Miniwax Special Walnut)
  • random distressing tools such as hammer, screwdriver, nails, screws, etc.
  • Nails (you could use wood screws if you’d like – I personally liked the nail look better)
  • Sander & Hammer

Steps:

  1. First things first, get to work on distressing your wood. YES, this is a sock in my picture. Fill the sock with nails and screws and bang away at the wood to create something awesome. I took the hammer, screwdriver and even a glass of cold water to my wood. I really enjoyed this part! {I even decided to make a little heart in one spot} Here are some photos of my favorite parts and what it looked like after I stained it. ImageImageImageOR – if you have a curious new pup like I do, you can let them chew it up a little for ya. I tried explaining to her that wood is not good for her, but she kept going back for more. -__-

    photo

  2. After you are done distressing the wood, sand it down and start staining.
    Image
  3. Wait 24 hard/long hours before you can move onto the next step of hanging it up! Measure out where you’d like the headboard exactly and either nail or screw it in 🙂 I left a tiny little gap in-between each one.
    Image
  4. Lastly, put the bed back in front of the headboard and ENJOY your awesome new view!!! It’s just too bad this is in my guest room, because I am in LOVE with this headboard. =]

Overall, this project was very simple and under $30 for me since I already had the sander, stain and nails. It would have been nice to have a second person there to help me hang the first piece of wood, but I figured it out all by myself…so I know you can too! 🙂

Here are a few more pics for ya’ll – let me know what you think! And come back next week for a DIY sign going above this headboard right here!

Image

Image

Image

-ashleigh.

What’s for dinner?!

Hello again friends and HAPPY FRIDAY!!

I’ve been super duper busy lately with work and two puppies and spending as much time as I possibly can with my husband before he deploys soon….but with that said, I have a really easy one for ya this week! A DIY kitchen menu – check it out:
 Image
This is NOT a good picture by any means, this looks like the typed words are dull, but I assure you it looks great in person! 🙂
VERY EASY STEPS:
1. Basically, Grab an old picture frame (or a new one if you’d like) and spray paint it a cool funky color. I had these in my garage from a previous project so I just used this color:
image image (2)  image (4) image (5)
 I had to prime it first since my frame was so dark and the blue color was kind of light. I used a few light coats.
2. Let it dry while you work something up in Microsoft Word like this:
image (6)
3. I had some fancy scrapbook paper in my craft room already (got this one at Hobby Lobby) – just place a regular sheet of printer paper on top of it and cut out the scrapbook paper to fit the frame size (mine was an 8×10 so it was easy).
image (7)
4. Print out your Word document on your fancy paper. If you only have one sheet of paper you may want to practice on a plain white sheet first to test it out and make sure everything is aligned right for your frame. {I just can’t seem to get a good picture of mine, the ink looks really dull here but it doesn’t look this way in person (I’m not a photographer that’s for sure)}
5. I decided to sand down the edges of my frame once it was dried. You know me, I love that worn down look. 🙂 You can skip this step if you’d like and also you may want to add some flowers/glitter/bows to your frame with some hot glue, I decided to keep this one simple so all of my projects don’t look the same. ;P
image (8)    image (10)
Once your frame is ready, place your Word document inside just like you would a picture and write on the glass with a dry erase marker. And there you have it, your weekly menu.  TA-DA that is all!! 🙂
image (9)
  image (11)
Stay tuned for next weeks DIY project!! Have a great weekend!
-ashleigh.

jewelry organizing time!!

TWO FOR TUESDAY!!

Hello again, since I missed my post last week I decided to post TWO today! Lucky you 😉

Check out this AWESOME DIY earring holder AND necklace holder:

Image

Image

FIRST I’ll show you how to make your own earring holder using these 4 simple items:

  • a picture frame
  • lace
  • hot glue gun
  • tape

STEP 1: take your photo frame and turn it over taking out the glass and cardboard.
STEP 2: cut out a piece of lace to fit the back side of your picture frame.
STEP 3: tape down the lace pulling it as tight as you can so that way it doesn’t look floppy.
STEP 4: then hot glue away! Making sure you keep the lace as tight as possible without ripping it (I just left my tape attached to it because I’m lazy, but you can remove it if you wish)
STEP 5: once the glue is dry, attach your earrings and either hang up your picture frame or display it wherever you’d like to. HINT: if you wear earrings a lot I wouldn’t hang it up, because it could get annoying really quick having to take it down every time you want to put a pair on…I don’t wear earrings very often at all that’s why I hung mine up 🙂

PS. I bought my picture frame from Hobby Lobby for about $10. But you can always paint an old frame any color you’d like for this project.

Here are some photos for ya:

ImageImage

ImageImage

Image

ALRIGHTY, and NEXT I’ll show you how to make your necklace holder!

I picked up a few pallets awhile back, and they were too old and rusted to get much out of them….but with one of the pieces I did manage to get off in one piece I decided to make this:

ImageI should really stop doing projects late at night, gain a little more patience and take photos in the daylight for you guys. I was just WAY TOO excited to post this 🙂

Here’s what cha need:

  • a piece of pallet (or just a brand new piece of wood)
  • stain
  • knobs (got mine at….what for it….Hobby Lobby)
  • drill and dremel rotary tool

STEP 1: sand down your wood and stain it. I used Minwax Wood Finish since it was something I already had in the garage.

ImageImageImage

STEP 2: after the stain is dry, sand it down and measure out where you’d like your knobs to go, mark them, and drill holes.

Image

STEP 3: I used my Dremel rotary tool to cut off the ends of the knobs so that way I could hang it on the wall. The hubster wanted to give it a try so I got an awesome shot of him wearing my sunglasses as safety goggles ;P

ImageImage

STEP 4: Hang it up! Hang some necklaces on it and call it a day 🙂

I hope you guys enjoyed this one as much as I did! Let me know what cha think!!

Image

-ashleigh.

knock, knock.

Who’s there?

OH, just your rubber door mat hanging up as ART! Ch-ch-check out it folks!!!

Image

Here’s another easy easy DIY project for ya! All you need is:

  • a rubber door mat ⇢ some people say you can find these for $1 at the dollar store…however I had no such luck. I picked mine up from wally world for just under $10!
  • white spray paint (or any color you wish)
  • sandpaper (optional)
  • a few nails and a hammer

This project is literally the easiest one I’ve done yet! It was a late night project that only took about 20 minutes to dry 🙂 sweeeett!!

Here are the steps for you:

  1. pick out a rubber door mat with an awesome design
    Image
  2. also pick up some spray paint; any brand; any color (I already had some in the garage so I went with what I had)
    Image
  3. go home and follow the directions on your spray paint bottle and get to work. I did about 3-4 light coats and it was dried and ready to be sanded within 20 minutes!
    ImageImage
  4. I love the distressed look – so I took my 3M sandpaper block and roughed up the edges and the middle a little bit. You can skip this step altogether if you’d prefer, or you can go sand paper crazy and distress it a lot more than I did!
    Image
  5. FINAL STEP: once your mat is completely dry all you have to do is hang it up somewhere! TA-DA! SO SO EASY and lovely looking at the same time =] Here are some more pics of my door mat for you:
    Image

Image

Image

Image

As I mentioned before, this was a late night project for me so the lighting isn’t all that great, and I’m no photographer that’s for sure! But you get the point 🙂 I’m going to get some smaller mats and hang them vertically, side by side, in our guest room – there are many different style mats and hanging options to consider. I hope you enjoyed this one as much as I did! Let me know what you think!

-ashleigh.

easy diy necklace!!

This literally is so easy a caveman can do it!! You ready for it??

Image

Image

Here’s what I did:

  1. I took some cheap pearls I’ve had for years – folded them in half and added some ribbon! POW! Genius!!
  2. OPTIONAL: Depending on how stretchy your necklace is, you may want to cut each side once the necklace is bent in half, take some pearls off, tie a knot and then add ribbon… or you can try and stretch the necklace out and place your ribbon in the little space between the pearls. It really just depends on what necklace you’re using, and what you like. Don’t forget to change something up and make it your own =)

Here are some photos for ya’ll!

Image

Image

Image

Image{↑ this was before I realized I needed to cut the end, take some pearls off, and then tie a knot…one of my necklaces had a clasp on it, therefore making a huge gap when it was finished. I fixed it though!}

Image

ImageLet me know what cha think! And don’t forget to share your DIY necklace with me =)

-ashleigh.

DIY DOG LEASH HOLDER

Are you tired of putting your dogs leash’s and/or collars on your tables, couches, or just tossed all over the place? Well this just may be the project for you! I know we could go out and buy something that says “DOG” written across it with 3 little hooks, but I wanted mine to be a little more personable with maybe a name or a picture attached to it. So I came up with this:

Image

Wanna know how I did it? Well it was very simple! All you need is a cute pup like mine and the following supplies:

  • a wood plaque of any size or shape you’d like {got mine at Hobby Lobby – YUP!}
  • acrylic craft paint – two different colors – whatever colors or brands you’d like. I like to use whatever dries fastest because I can be impatient during this step.
  • painters tape
  • three knobs of your choice {again, I got mine at Hobby Lobby}
  • super glue
  • 4×5 picture frame
  • ribbon
  • a super cute puppy [optional]

Remember, you can always change up any of these steps and supplies to make it your own unique style =)

This was also an older project of mine, therefore I didn’t get a TON of pictures for ya. But it’s still pretty easy with just the instructions.

  1. first things first – painting your wood plaque! This is the shape I decided on for this project:  Image 
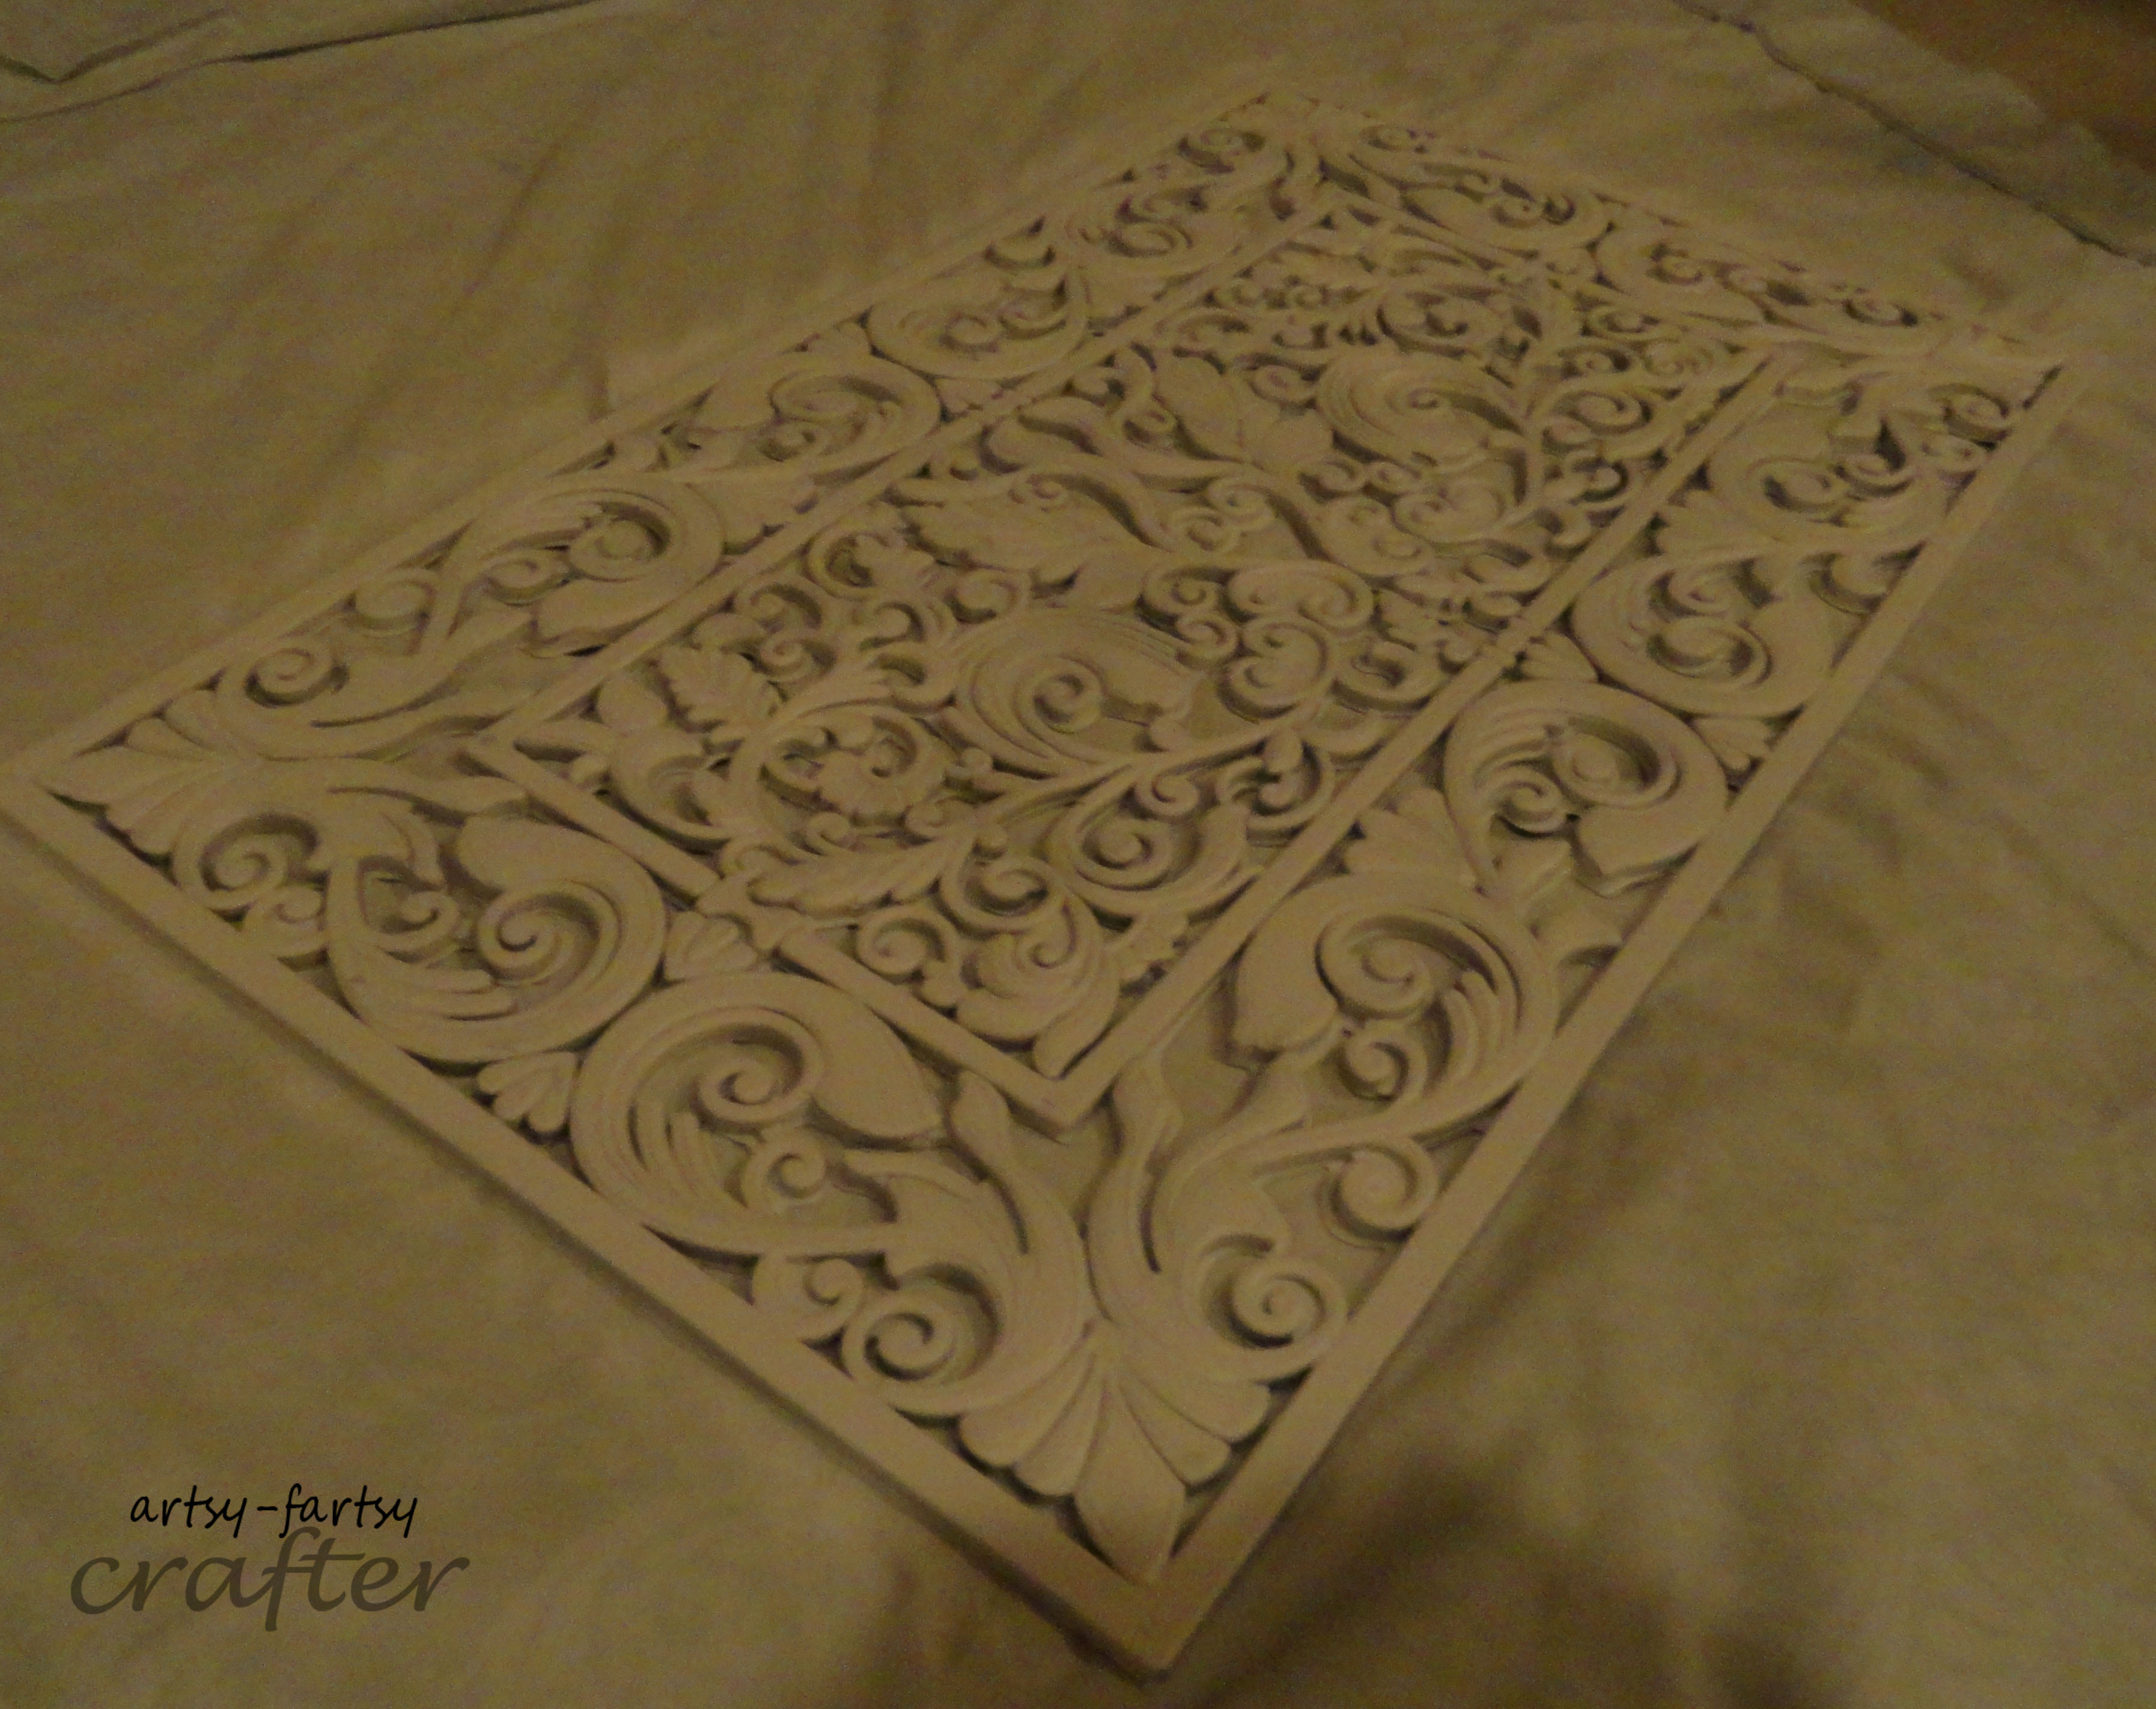
I began by painting the entire plaque with white acrylic paint. After about 30 mins I gave it another coat and let it dry for about an hour.
  2. after the second coat of paint was dried I taped of the plaque with painters tape about every               1 ½ inches to paint some green stripes on there. You can paint chevrons, stars, hearts, UFO’s, whatever your little heart desires =) Then I let that dry for a couple of hours.
  3. after my plaque was finished drying I then measured out exactly where I wanted my knobs to go, marked it with a pencil, and super glued them right on! As simple as that! (if only! I actually tried to drill holes through the plaque and screw the knobs in the back, but the plaque started bending and splitting in a few places. SO then I tried what any normal DIYer would: I pulled out my hot glue gun. That wasn’t smart. The knobs were falling off two minutes into the glue drying. I finally decided this was a job for super glue! You’re welcome!!)
  4. after my whole knob experience was over I went to my printer and fed it some glossy photo paper for my itsy bitsy photo frame (normally I wouldn’t recommend printing your own picture because most of the time it turns out blurry, but for something as small as this one it worked just fine)
  5. I cleaned the inside glass of the photo frame about 7 times before I placed my photo in there (OCD much?) and then placed the cardboard back in behind the photo and super glued the frame right onto the wood plaque. Easy peasy! Just make sure you measure out the middle of the plaque and once you have it centered where you want it you’re good to glue away.
  6. finally, I cut some ribbon and super glued that to the back of the plaque. I decided to super glue it in two different places and just tie a bow at the top…but you can do this however you’d like.
  7. hang the plaque up, add some dog leash’s to the knobs and BAM! You’ve just completed your own personal dog leash holder!

Whatcha think??!

Image                                         Lola seems to like love it! ;PImage


Can’t wait to share my next project with ya’ll! Have a great week!

-ashleigh.